
Oh, how annoying these heating bills are! Let's be honest — who among us doesn't want to pay less and live in warmth? Since ancient times, humanity has strived to create comfortable conditions in their homes, especially in terms of maintaining optimal temperature. In 2025, mineral wool became an absolute hit among insulation materials — its market share exceeded 40% in Europe. And this is not surprising! Stone wool and basalt wool for insulation are used everywhere — from walls and floors to roofing and facades. You know, mineral wool insulation is like a down comforter for your home — light but incredibly warm. Or imagine that your house put on a warm sweater that protects against cold, noise, and even fire at the same time!
Characteristics of Mineral Wool and Its Types
 Mineral wool is a versatile insulator consisting of thin fibers of mineral origin. Mineral wool insulation is characterized by high thermal insulation properties and non-combustibility. It's not always easy to choose the right option among the variety. But the effectiveness of the material is worth the effort.
Last month, I started a renovation at my country house and went online to study types of insulation. My head was spinning! Mineral wool, glass wool, basalt... After three hours in a construction hypermarket with a tape measure and calculator, I decided on basalt wool. Honestly, its performance characteristics turned out to be significantly higher than my expectations — the house really became noticeably warmer and quieter. Mineral wool insulation really works!
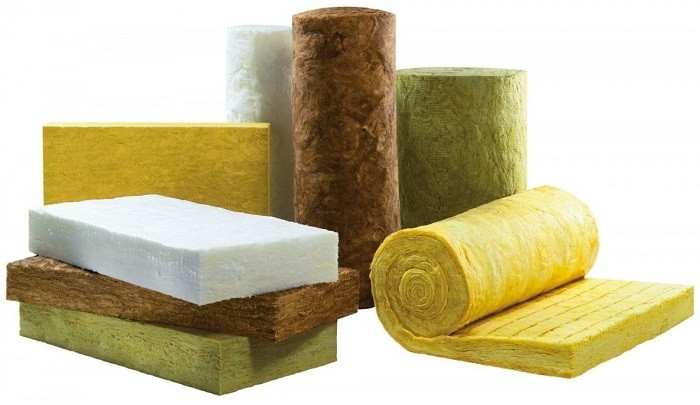
Let's understand the varieties of mineral wool to choose exactly what you need for your home. There are several main types of mineral wool that differ in composition and application:
- Glass wool — made from recycled glass with the addition of sand and other components
- Stone (basalt) wool — produced from the melt of basalt group rocks
- Slag wool — created from blast furnace slag and other industrial waste
The choice of a specific type of mineral wool depends on the insulation task, budget, and operating conditions. For humid rooms, hydrophobized stone wool is better suited, while more affordable glass wool may be sufficient for interior partitions and sound insulation.
Key characteristics of mineral wool to consider when choosing:
| Parameter | Glass wool | Stone (basalt) wool | Slag wool |
|---|---|---|---|
| Density, kg/m³ | 11-35 | 25-220 | 30-150 |
| Thermal conductivity, W/(m•K) | 0.038-0.046 | 0.032-0.048 | 0.040-0.050 |
| Application temperature, °C | up to 450 | up to 1000 | up to 300 |
| Service life, years | 30-40 | 40-50 | 20-30 |
| Vapor permeability, mg/(m•h•Pa) | 0.5-0.6 | 0.3-0.5 | 0.3-0.4 |
| Water absorption, % | up to 70 | up to 1.5 (hydrophobized) | up to 30 |
| Combustibility class | NG (non-combustible) | NG (non-combustible) | NG (non-combustible) |
This table clearly demonstrates the advantages of different types of mineral wool for insulation. Pay special attention to thermal conductivity indicators - the lower they are, the better the material retains heat. Basalt wool for insulation has the best combination of fire resistance and water resistance, making it an ideal choice for exterior insulation of facades and roofing.
"When choosing mineral wool, forget about the price for a minute — check the characteristics first! Here's a life hack from a builder with 15 years of experience: for facades, take slabs from 80 kg/m³, for roofing 35 kg/m³ is enough, and for partitions and sound insulation — 20-30 kg/m³. And also — feel the material with your hands! Quality mineral wool should quickly restore its shape after compression and not crumble. Such a small thing, but it will save you thousands of dollars in heating and repairs," — shares Nikolai Kovalenko, a foreman from Transcarpathia who has insulated more than 120 houses during his career.
Thermal and Sound Insulation Properties of Mineral Wool
Mineral wool is a true champion among insulators in terms of versatility. The thermal insulation properties of mineral wool are due to its fibrous structure, which holds many air pockets. It is this air that is an excellent barrier to heat transfer. And if you've ever stood next to a working generator, you know the value of good sound insulation!
Like a polar bear's fur protects it from arctic cold, mineral wool protects your home from frost. And this is not just a beautiful comparison. The thermal conductivity of mineral wool ranges from 0.032 to 0.048 W/(m•K), which allows significantly reducing heating costs. With an insulation thickness of 150 mm, thermal insulation with mineral wool can reduce the cost of heating a room by up to 40-50% during the cold period.
In addition, sound insulation with mineral wool reduces noise levels by 45-55 dB, making it an ideal choice for noisy urban areas.
Insulating a home with mineral wool is an investment that pays for itself after 3-4 heating seasons through energy savings. According to research conducted by the Association of Insulation Material Manufacturers, a properly insulated house loses 2.5-3 times less heat, which in monetary terms constitutes savings of about $400-600 per year for an average private home.
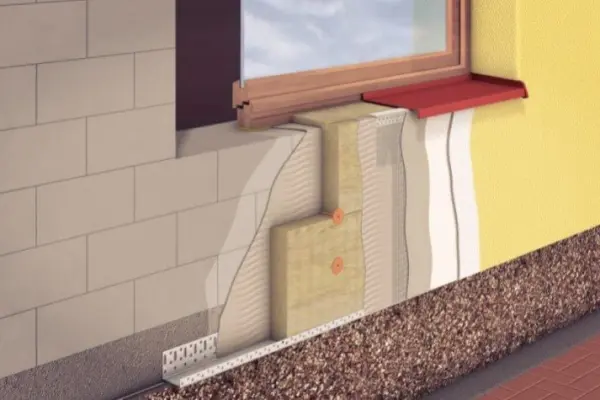
Wall Insulation with Mineral Wool: Methods and Technologies
There are two main approaches to insulating walls with mineral wool: external and internal. Most experts recommend external insulation as it allows preserving living space and prevents the formation of cold bridges. Let's look in more detail at the technology of insulation with mineral wool.
External Wall Insulation with Mineral Wool
 External insulation with mineral wool can be done using two main technologies:
- Ventilated facade with mineral wool — a system where an air gap for ventilation is created between the insulation and the cladding
- Mineral wool in a plastered facade ("wet facade") — the insulation is attached to the wall and covered with a reinforced plaster layer
The process of installing mineral wool for external insulation includes the following stages:
- Surface preparation — cleaning walls from dirt and old finishes, leveling, antiseptic treatment
- Installation of the starter profile (for plastered facades) or battens (for ventilated ones)
- Attachment of mineral wool — slabs are fixed with adhesive and additionally secured with plate dowels (5-7 pieces per 1 m²)
- Creation of a protective layer — for a ventilated facade, a windproof membrane is installed; for a plastered one, a reinforcing mesh and a base plaster layer
- Finishing — cladding (siding, panels) for a ventilated facade or decorative plaster for a "wet" one
Compliance with all stages of mineral wool installation and the correct sequence of work guarantees high-quality insulation of external walls. According to construction experts, more than 70% of insulation problems arise precisely due to violations in installation technology, not because of the quality of the insulation material itself.
"How many houses have been ruined due to improper vapor barrier — countless! Every second customer tries to save on this. And what happens then? After a year or a year and a half, they call with complaints about mold, condensation, and the smell of dampness. Remember once and for all: a quality vapor barrier costs about $2-3 per square, and redoing the entire structure — from $30-50! Always install vapor barriers on the side of the warm room, seal joints with special tape, and don't forget about the ventilation gap — it's like a road for accidental moisture to escape," — says Oleg Melnik, a builder with 12 years of experience, author of the YouTube channel "Insulate Wisely".
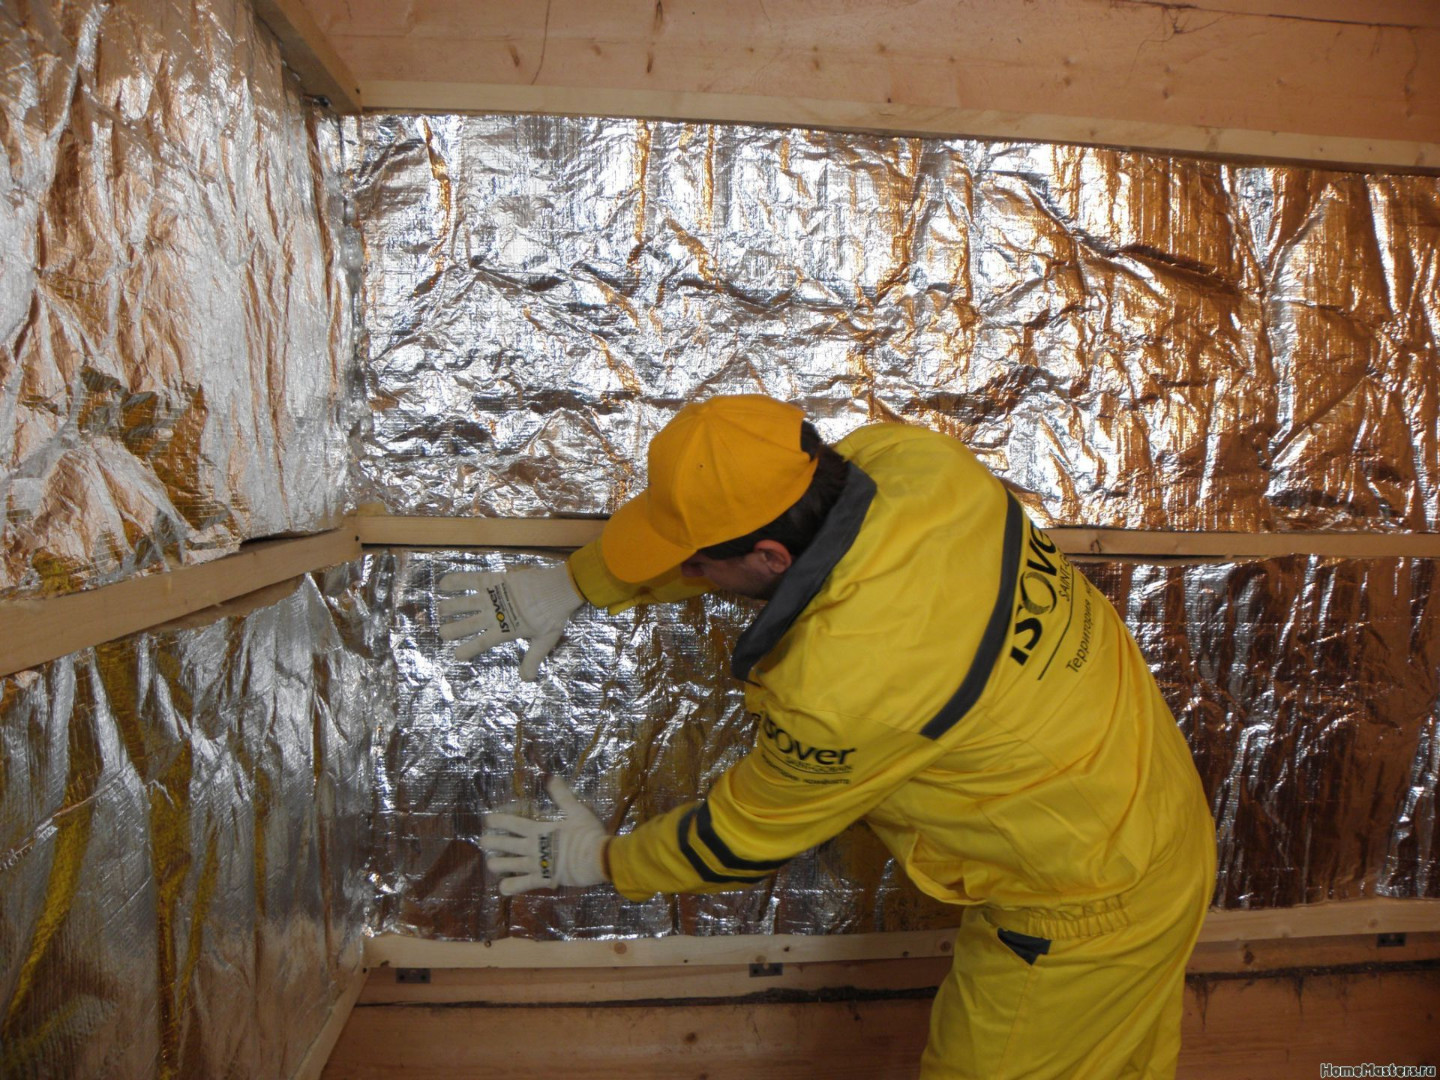
Internal Wall Insulation with Mineral Wool
 When external insulation is impossible (for example, in historical buildings), internal insulation is used. Last week I stopped by a friend's office in Podil — they recently insulated the walls from the inside, and now it's like Thailand in winter there, although it's -10°C outside! And the heating bills have been halved. The technology of laying mineral wool for internal insulation includes:
- Installation of a frame made of metal profiles or wooden bars
- Laying mineral wool between frame elements
- Installation of a vapor barrier membrane (mandatory for internal insulation!)
- Installation of interior finishes (drywall, wall paneling, etc.)
The technology of internal wall insulation with mineral wool allows effectively insulating a room in cases where external insulation is impossible. When properly installed, such insulation can reduce heat loss through walls by up to 60% and significantly improve the sound insulation of rooms.
For internal insulation, it is critically important to properly install vapor barriers that will prevent moisture from penetrating from the room into the insulation. By the way, few people know, but improper vapor barrier is like giving a ticket to a concert in your home to fungi and mold. Because of it, mineral wool can get wet, lose its properties, and goodbye, money spent on insulation!
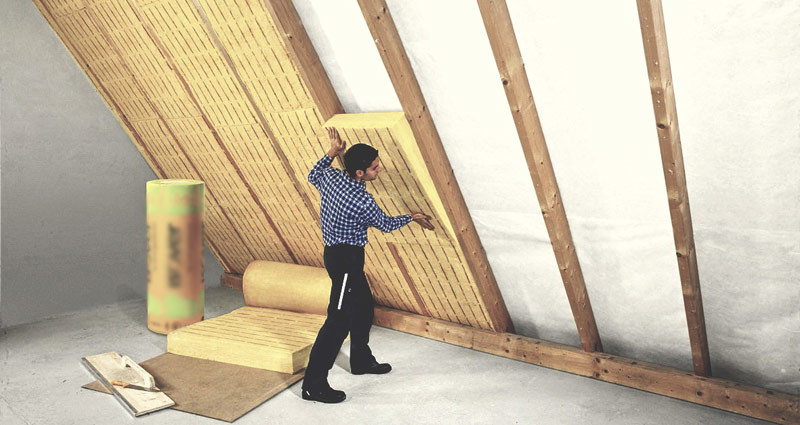
Roof Insulation with Mineral Wool
 Thermal insulation with mineral wool for pitched and flat roofs has its own characteristics. Roof insulation with mineral wool can reduce heat loss through the roof by up to 30%, which in real money means savings of about $300-500 per heating season for a house with an area of 150 m². I verified this myself last winter. The average cost of such insulation is $25-35 per square meter — the investment pays off in about 3-4 years.
For pitched roofs, it is advisable to use rolled mineral wool or low-density mineral wool slabs (25-35 kg/m³), which are laid between the rafters. The roofing "pie" includes:
- Interior finish (for example, drywall)
- Vapor barrier (on the room side)
- Mineral wool between rafters
- Hydro-windproof membrane
- Counter battens for ventilation gap
- Battens and roofing covering
The correct sequence of layers when insulating a roof with mineral wool plays a key role in the effectiveness of the entire system. Special attention should be paid to the quality of vapor barriers and air gap for ventilation, which prevent condensation accumulation and extend the life of thermal insulation.
For flat roofs, rigid high-density mineral wool slabs (from 100 kg/m³) are used, capable of withstanding operational loads.
"In 2022, our family decided to insulate an old wooden house in the suburbs of Toronto. Winter heating bills reached $400 per month! After consulting with a contractor, we chose mineral wool with a density of 30 kg/m³ for walls and roofing. Installation took a week, including vapor barrier installation. The results exceeded all expectations: in the winter of 2023, bills were reduced to $150, and the house became much quieter thanks to excellent sound insulation. We not only save money but also enjoy comfort without drafts. Now we recommend mineral wool to all neighbors who decide to insulate."
Floor Insulation with Mineral Wool
Floor insulation with mineral wool is relevant both for first floors and for inter-floor ceilings where sound insulation is important. Depending on the floor structure, various technologies for laying mineral wool are used.
Floor Insulation on Joists
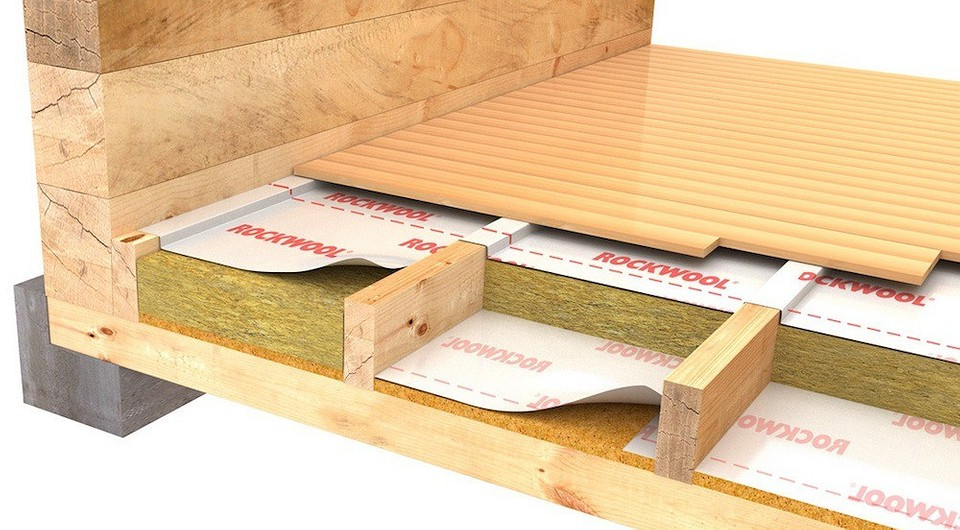 For wooden floors on joists, the insulation process looks as follows:
- Installation of joists with a step corresponding to the width of mineral wool slabs or rolls
- Laying mineral wool between joists (density 25-50 kg/m³)
- Installation of vapor barrier (in case the insulation is located above a heated room)
- Laying of the subfloor (plywood, OSB) and finish covering
Floor insulation with mineral wool on joists is a popular and effective method of thermal insulation in wooden houses. This method provides not only excellent thermal insulation but also quality sound insulation between floors, which is especially important for two-story houses and attic rooms.
Concrete Floor Insulation with Mineral Wool
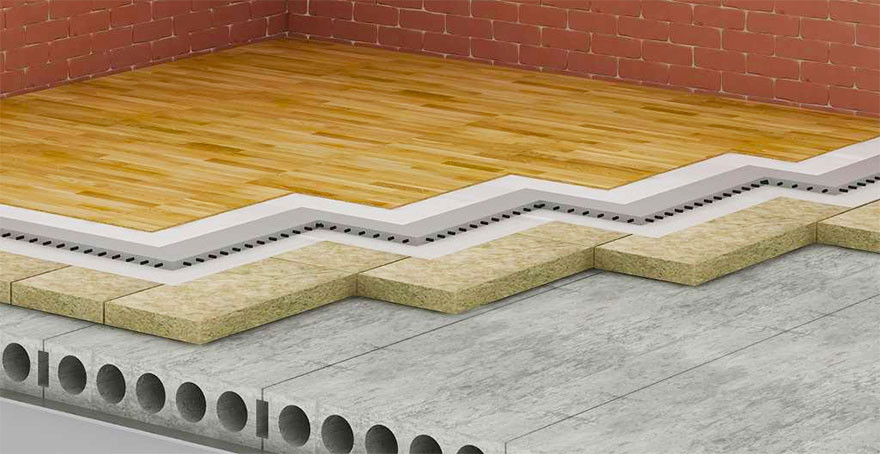 For concrete floors, the technology is somewhat different:
- Base preparation — leveling, waterproofing (if necessary)
- Laying rigid mineral wool slabs (density from 100 kg/m³)
- Laying a separation layer (polyethylene film)
- Pouring cement-sand screed (minimum 40 mm)
- Installation of finish covering
Insulating a concrete floor with mineral wool requires the use of high-density slabs that will withstand the pressure of the screed and operational load. This is a more complex process compared to insulation on joists, but it provides excellent thermal insulation and durability of the structure when all stages are properly performed.
The thickness of mineral wool for floor insulation depends on climatic conditions and ranges from 50 to 150 mm. For effective insulation in a temperate climate zone, a thickness of 100 mm is considered optimal.
| Structure | Minimum thickness (mm) | Optimal thickness (mm) | Recommended density (kg/m³) |
|---|---|---|---|
| External walls | 100 | 150-200 | 35-80 |
| Pitched roof | 150 | 200-250 | 25-35 |
| Flat roof | 150 | 200-300 | 100-180 |
| Floor on ground | 100 | 150-200 | 100-150 |
| Floor on joists | 100 | 150 | 25-50 |
| Internal partitions (sound insulation) | 50 | 100 | 20-40 |
The table above contains optimal parameters of thickness and density of mineral wool for various structures. For colder regions, it is recommended to increase the insulation thickness by 20-30% to compensate for increased heat loss. Remember that saving on insulation thickness can lead to a significant increase in heating costs in the future, so it's better to adhere to optimal values.
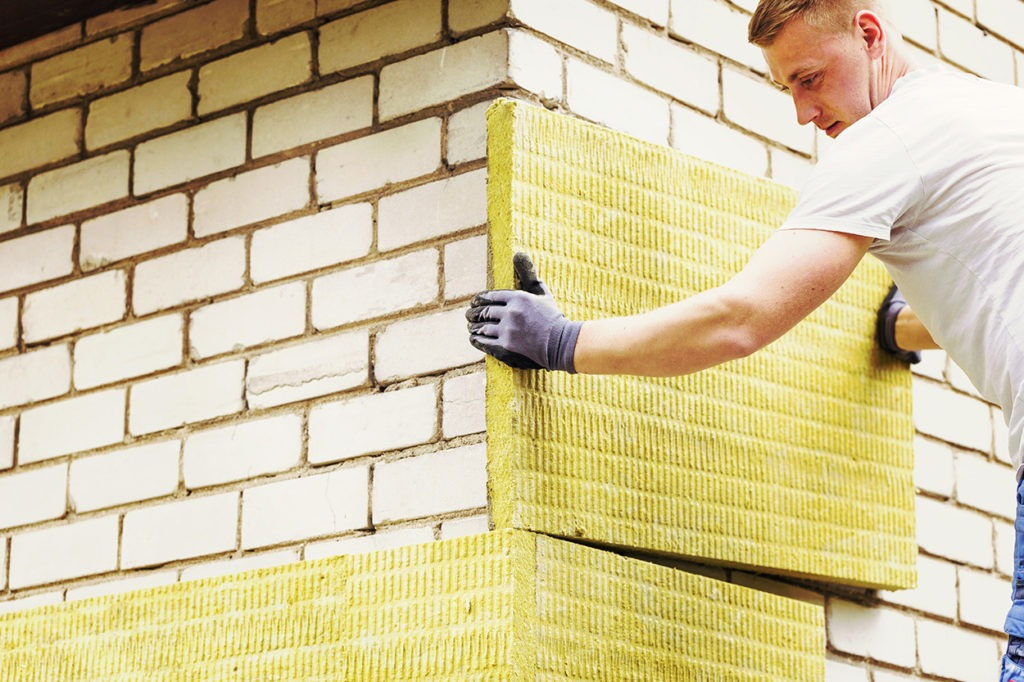
Facade Insulation with Mineral Wool: Effective Solutions
Facade insulation with mineral wool is one of the most sought-after solutions for improving energy efficiency of buildings. Mineral wool for external wall insulation is produced in the form of rigid slabs with high density (from 80 kg/m³), which provides the necessary strength and resistance to atmospheric effects.
For facade systems, two main types of mineral wool are used:
- Mineral wool in a plastered facade — slabs are glued to the wall, additionally fastened with dowels, and covered with a reinforced plaster layer
- Mineral wool for a ventilated facade — slabs are installed on battens with an air gap that provides ventilation and moisture removal
Both options provide excellent thermal insulation but have their own characteristics. A plastered facade with mineral wool is cheaper but more labor-intensive to install and requires perfectly even walls. A ventilated facade is more expensive but allows hiding wall irregularities and provides better protection against moisture.
According to statistics, quality facade insulation with mineral wool can reduce heat loss through walls by 50-70%, making this method one of the most effective in terms of energy saving. The service life of such insulation is from 30 to 50 years with proper installation.
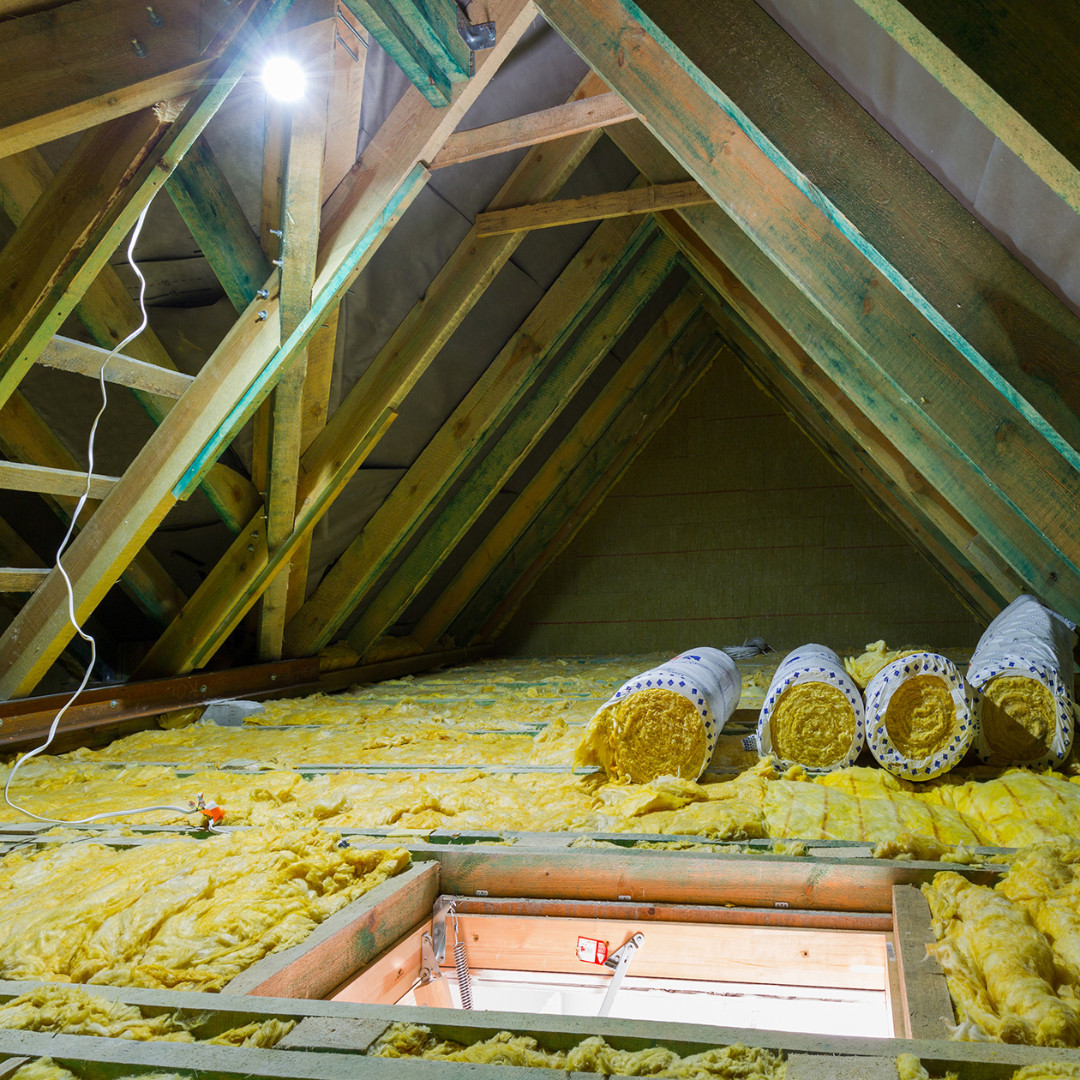
Attic and Ceiling Insulation with Mineral Wool
Attic insulation with mineral wool is one of the most cost-effective solutions for reducing heat loss in a house. After all, up to 25% of heat escapes through an uninsulated roof! My neighbor recently insulated his attic and immediately felt the difference. For ceiling insulation with mineral wool, both mats and slabs can be used, depending on the ceiling structure.
Money flying out the chimney? No, through the ceiling! But this is easy to fix.
When insulating an attic with mineral wool, it is important to ensure the correct sequence of layers:
- Vapor barrier on the room side
- Mineral wool (optimal thickness 200-250 mm)
- Hydro-windproof membrane
- Ventilation gap
An important feature of ceiling insulation with mineral wool is the need to ensure reliable vapor barriers to avoid moisture from the room entering the insulation. In my experience, this is especially important for bathrooms and kitchens, where the humidity level is significantly increased and can lead to the insulation material getting wet.
Many homeowners choose rolled mineral wool for attic insulation. It's light. Convenient to install. Simply rolls out over the ceiling.
The cost of attic insulation with mineral wool is relatively low — about $10-15 per square meter, including materials and labor. Savings begin immediately after the work is completed.
Mineral Wool Installation Technology: Basic Rules
 Proper installation of mineral wool determines the effectiveness of all insulation. Regardless of the structure being insulated, there are general rules for laying mineral wool that must be followed.
Preparatory Work
Preparation is the most important stage, including:
- Cleaning and leveling the surface
- Protection against biological effects (mold, fungus)
- Elimination of leaks and sources of increased humidity
- Creation of necessary battens or bases for fastening
Quality surface preparation before laying mineral wool is the key to the durability of the entire thermal insulation structure. Experienced builders recommend paying special attention to this stage, as correcting errors in subsequent stages may require complete dismantling of already completed work.
Basic Principles of Laying Mineral Wool
- Tight fit — there should be no gaps between slabs or mats
- Joint offset — in multi-layer laying, the joints of the upper layer should not coincide with the joints of the lower layer
- Protection from moisture — mandatory use of vapor barriers and waterproofing
- Proper fastening — use of special dowels that do not compress the material
- Working with protective equipment — mandatory use of gloves, respirator, and safety glasses
Adherence to these principles of laying mineral wool guarantees maximum insulation efficiency and material durability. It is especially important not to allow gaps between slabs — through such "cold bridges" up to 30% of heat can escape, negating all the advantages of even the highest quality insulation.
"The biggest folly I encounter at construction sites is when mineral wool is left without protection from moisture! Imagine you put on a down jacket and went out in the rain without an umbrella. What will happen? Right — you'll freeze even faster than without the down jacket! It's the same with mineral wool: if it gets wet, it loses up to 80% of its thermal insulation. And even worse — it starts to rot and gets covered with mold. Therefore, always make the insulation pie according to the rules: vapor barrier from the inside, hydro-wind protection from the outside, and be sure to think about ventilation so that the structure can 'breathe'. In 15 years of work, none of my sites have encountered insulation problems, although many are located in areas with extreme humidity," — says Taras Boyko, a practical builder from the Carpathians.
Comparison of Mineral Wool and Foam Plastic for Insulation
The choice between mineral wool and foam plastic often puts homeowners at a dead end. Both materials are popular. Each has its pros and cons. Let's figure out what their differences are.
Mineral wool for insulation, like an experienced bodyguard, protects not only from cold but also from noise and fire. Unlike it, foam plastic is more of a specialized worker who does an excellent job with thermal insulation but is absolutely useless in a fire and weak in sound insulation.
The main advantages of mineral wool over foam plastic:
- Non-combustibility (class NG) versus combustibility of foam plastic (G3-G4)
- Excellent sound insulation, while foam plastic hardly absorbs sound
- Vapor permeability, allowing walls to "breathe" (foam plastic creates a vapor-impermeable barrier)
- Resistance to rodents and insects (foam plastic often becomes a home for rodents)
- Environmental friendliness and safety (foam plastic releases toxic substances when burning)
At the same time, foam plastic wins in several aspects: it is lighter, cheaper (by 15-30%), easier to install, and has slightly better thermal insulation indicators. But this economy can turn into serious problems in the future.
According to 2024 statistics, mineral wool is used in 58% of private house insulation cases in Europe, while foam plastic is used in only 31%. This indicates that more and more people prefer safety and reliability over immediate savings.
Features of Using Mineral Wool for Saunas
 Insulating a sauna is a task with its own characteristics. It requires a special approach. In conditions of high humidity and high temperatures, not every material can cope.
Mineral wool for saunas should have the following properties:
- High thermal resistance (up to 500-600°C)
- Hydrophobicity (water-repellent properties)
- Environmental safety (absence of toxic emissions when heated)
- Vapor permeability (allows structures to "breathe")
For sauna insulation, it is recommended to use only basalt (stone) wool, as glass wool has lower thermal resistance and can release harmful substances when heated. By the way, mineral wool for saunas must be treated with hydrophobizing additives to reduce water absorption.
Last summer I participated in insulating my friend's sauna in the Carpathians. We chose hydrophobized basalt wool with a density of 50 kg/m³ and a thickness of 100 mm. In winter, the temperature inside the sauna stays excellent even at -20°C outside, and wood consumption has been reduced almost by half.
When installing mineral wool in a sauna, be sure to use aluminum foil or special foil vapor barrier on the side of the steam room. This will create an additional heat-reflecting layer and protect the insulation from moisture. The cost of such insulation will be approximately $15-20 per square meter including labor, but the savings on heating and comfort are worth this investment.
Energy Efficiency and Environmental Friendliness of Mineral Wool
In an era of rising energy prices, the energy efficiency of insulation becomes a critical factor. Mineral wool in this aspect is a real find! It works like a thermos. Keeps warmth in winter and coolness in summer.
According to research by the European Association of Insulation Material Manufacturers, insulating a house with an area of 150 m² with mineral wool 150 mm thick allows reducing heating costs by 40-60%. In monetary terms, this is a saving of $500 to $800 per year at current energy prices. Investments in insulation pay off in 3-5 years, and such insulation serves up to 50 years!
The environmental friendliness of mineral wool also deserves attention. Modern manufacturers use up to 80% recycled raw materials in the production of glass wool and up to 30% in the production of basalt wool. This significantly reduces the carbon footprint of the material.
I recently talked with a representative of ISOVER, and he shared interesting data: the production of mineral wool that can insulate an average house consumes approximately as much energy as this house will save in 5-7 months of operation. After this period, the insulation starts working "in the positive" from an ecological balance point of view.
An important indicator of insulation energy efficiency is its thermal resistance (R-value). For mineral wool, this indicator ranges from 2.5 to 3.7 m²•K/W with a thickness of 100 mm, which is a very good result. The higher the R-value, the better the insulating properties of the material.
Mineral wool contributes not only to energy saving but also to reducing CO₂ emissions into the atmosphere. According to experts' calculations, proper insulation with mineral wool of an average private house reduces carbon dioxide emissions by 1.5-2 tons annually. It's like giving up a car for a whole year!
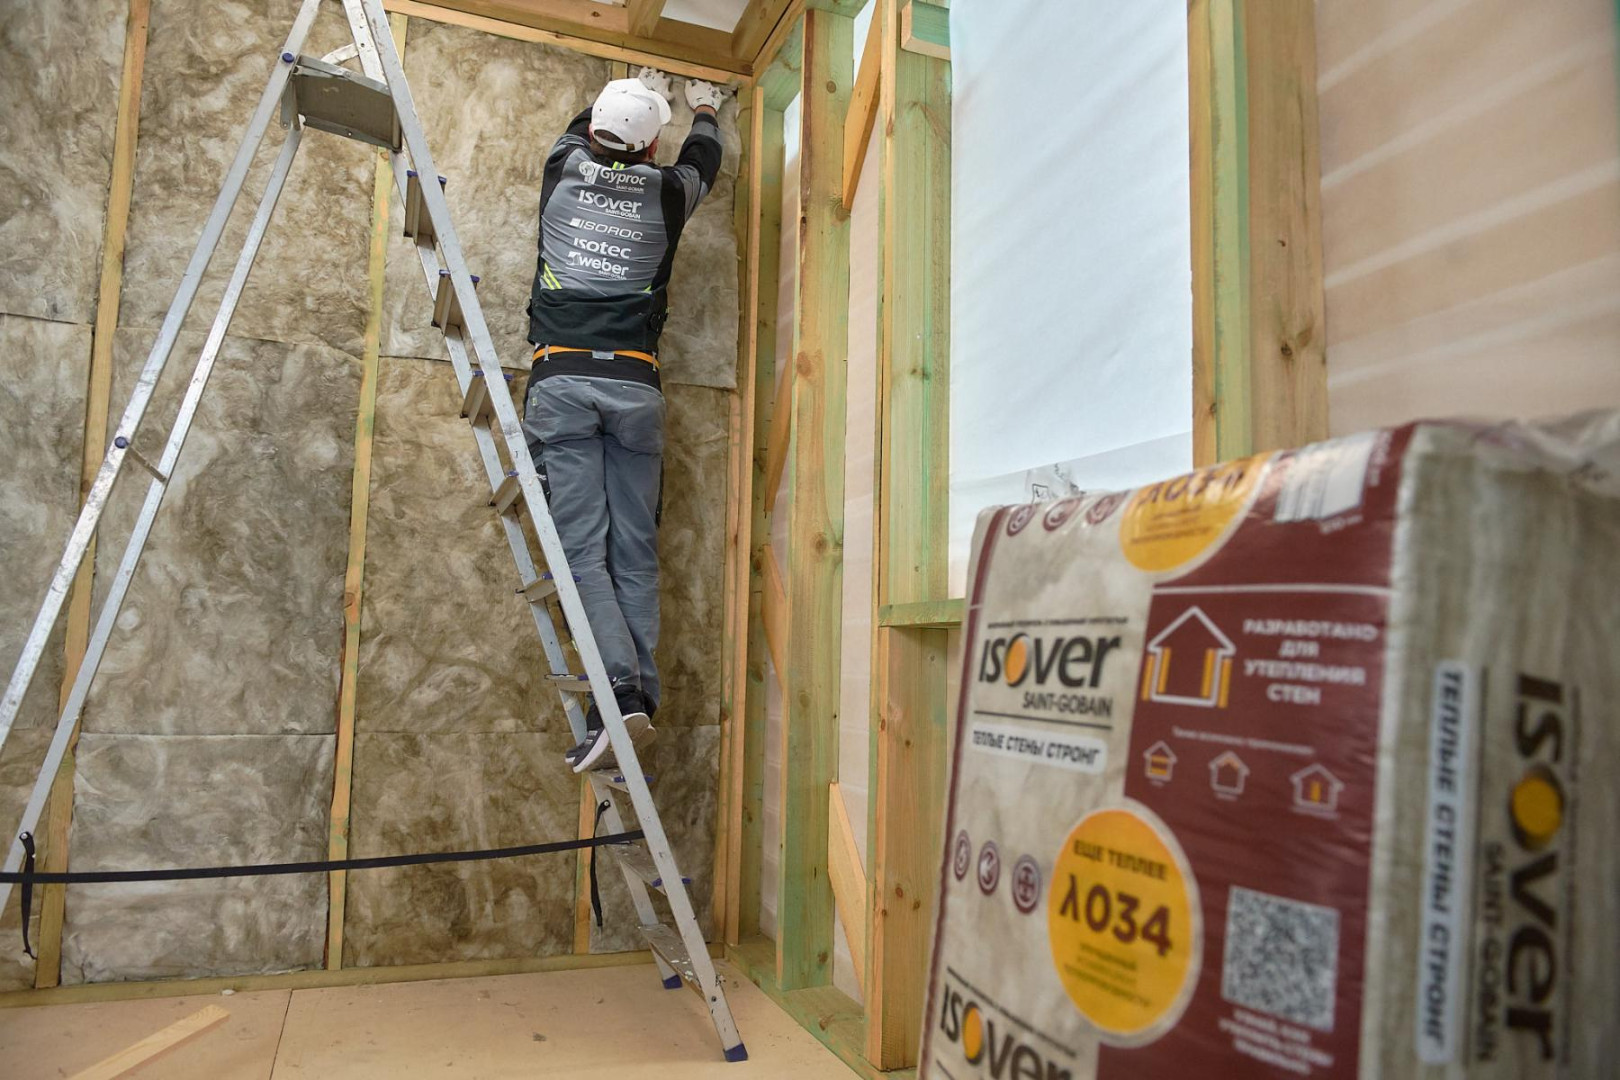
Insulating a Frame House with Mineral Wool
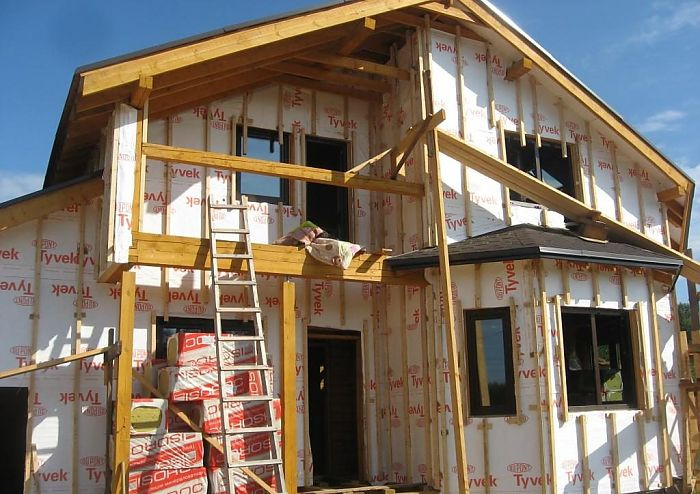 Frame construction is gaining popularity due to speed of erection and cost-effectiveness. Insulating a frame house with mineral wool is an ideal solution for such structures. The material is simply made for this. It's easy to install between frame elements.
For insulating frame walls, mineral wool with a density of 35-50 kg/m³ is usually used, which provides an optimal ratio of thermal insulation properties and mechanical strength. Last year I helped a friend build a frame house in the suburbs, and we used mineral wool with a thickness of 150 mm for walls and 200 mm for roofing — calculations showed that these are optimal parameters for our climate.
The technology of insulating a frame house with mineral wool includes several key stages:
- Installation of vapor barrier on the inner side of the frame (on the room side)
- Cutting mineral wool to size between frame posts (with a margin of 1-2 cm for tight installation)
- Laying mineral wool between frame elements without gaps and voids
- Installation of wind-moisture protective membrane on the outside
- Arrangement of a ventilated facade for moisture removal
Important! Mineral wool should completely fill all the space between frame posts, leaving no gaps.
The cost of insulating a frame house with mineral wool is approximately $18-25 per square meter, including materials and labor. Honestly, this is one of the most profitable investments in construction, considering that a properly insulated frame house in terms of thermal insulation properties is not inferior to a brick one with walls 1.5-2 bricks thick.
The energy efficiency of a frame house with mineral wool can be 20-30% higher than that of traditional buildings of the same area. This leads to significant savings on heating and air conditioning throughout the entire service life of the building.
Choosing and Buying Mineral Wool for Insulation
When it comes time to buy mineral wool for insulating your house, it's important to consider several key factors. Head spinning from the choice? This is normal. First of all, determine the type of mineral wool suitable for your task. The price of mineral wool for insulation varies depending on the manufacturer, density, and additional properties of the material.
At the construction market last month, I observed an interesting picture: buyers spent hours studying the characteristics of insulators but often missed one important point — the correspondence of the material to the specific task. After all, mineral wool for roof insulation and for sound insulation of partitions are completely different products!
Leading manufacturers of mineral wool in the market:
- ISOVER — a wide range of glass wool and stone wool for various insulation tasks
- KNAUF — quality mineral wool with excellent thermal insulation characteristics
- TECHNONICOL — one of the largest producers of basalt wool in Eastern Europe
- URSA — specializes in the production of glass wool and rolled materials
The materials of these manufacturers are distinguished by high quality. They comply with international safety standards. Honestly, the difference between them is not as great as advertising campaigns convince us, but each brand has its own features in the production of certain types of insulation.
The average cost of mineral wool in slabs with a density of 30-50 kg/m³ is $4-7 per square meter with a thickness of 100 mm. Rolled mineral wool usually costs somewhat less — from $3 per square meter.
For large-scale insulation projects, it is more profitable to buy mineral wool in bulk. Savings of up to 20%. Many manufacturers offer delivery directly to the construction site.
When choosing the best mineral wool for insulation, pay attention to the presence of hydrophobizing additives that reduce the water absorption of the material and increase its durability. Such mineral wool costs a bit more, but justifies the investment due to a longer service life.
Important Research Links
Don't want to take my word for it? You're doing the right thing! Let's turn to scientific research. According to research on the properties of mineral wool (Advanced Materials Research, 2012), basalt fibers provide not only high thermal insulation but also a significant reduction in sound penetration of structures — up to 45-55 dB. These data confirm the practical observations of builders about the multifunctionality of mineral wool.
In addition, modern methods of measuring thermal conductivity of thermal insulation materials (Journal of Thermal Analysis and Calorimetry, 2022) demonstrate that even with a reduction in material thickness, an optimal combination of characteristics can be selected for effective thermal insulation. This is especially relevant with limited space for insulation.
Conclusion: Advantages of Using Mineral Wool for Insulation
Mineral wool for insulation is a modern, environmentally friendly, and highly effective material that allows solving several tasks at once: thermal insulation, sound insulation, and fire protection. Insulation with mineral wool provides a comfortable microclimate in the room all year round and significant savings on heating and air conditioning.
The main advantages of mineral wool for thermal insulation:
- High thermal insulation properties
- Non-combustibility (class NG)
- Excellent sound insulation
- Vapor permeability ("breathing" walls)
- Environmental safety of modern products
- Resistance to biological influences
- Durability with proper installation
- Wide selection of density and sizes for various tasks
The listed advantages make mineral wool one of the most sought-after materials for insulation in modern construction. In terms of price-to-quality ratio, mineral wool for thermal insulation often outperforms other insulators, especially when not only thermal insulation but also sound insulation, fire resistance, and environmental friendliness are important.