
An outdoor oven for a gazebo transforms a regular relaxation area into a multifunctional space for cooking and heating. The market for outdoor ovens shows steady growth, reflecting increasing interest in outdoor cooking. But why overpay for ready-made solutions costing from $2000 when a DIY outdoor oven can be built for $300-800?
A wood-fired oven in a summer kitchen provides an efficiency of up to 75%, significantly surpassing traditional fireplaces (15-25%). It’s like the difference between a modern car and a horse-drawn cart.
It’s worth noting that a properly constructed brick oven for a gazebo lasts for decades, recouping costs within 2-3 seasons of use. A ready-made barbecue oven with similar characteristics requires significant investment.
Practical tip: Start planning the oven at the gazebo design stage. This allows for a reinforced foundation and proper ventilation calculations.
Main Types of Ovens for a Summer Kitchen
 The modern market offers several main types of ovens. A mini Russian oven is ideal for baking and slow-cooking dishes.
A Pompeii oven specializes in pizza and quick cooking, reaching temperatures of 500°C in half an hour. A tandoor oven opens up possibilities for Eastern cuisine with its unique dishes.
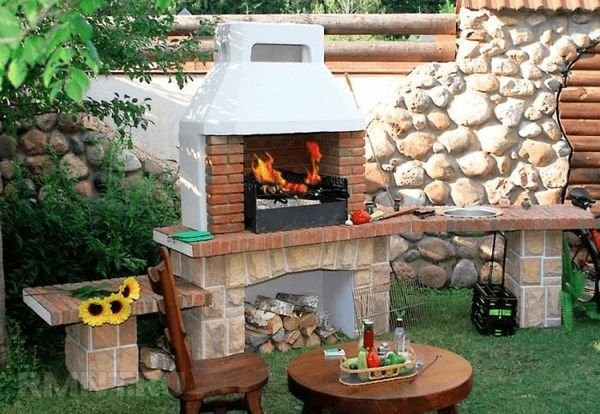
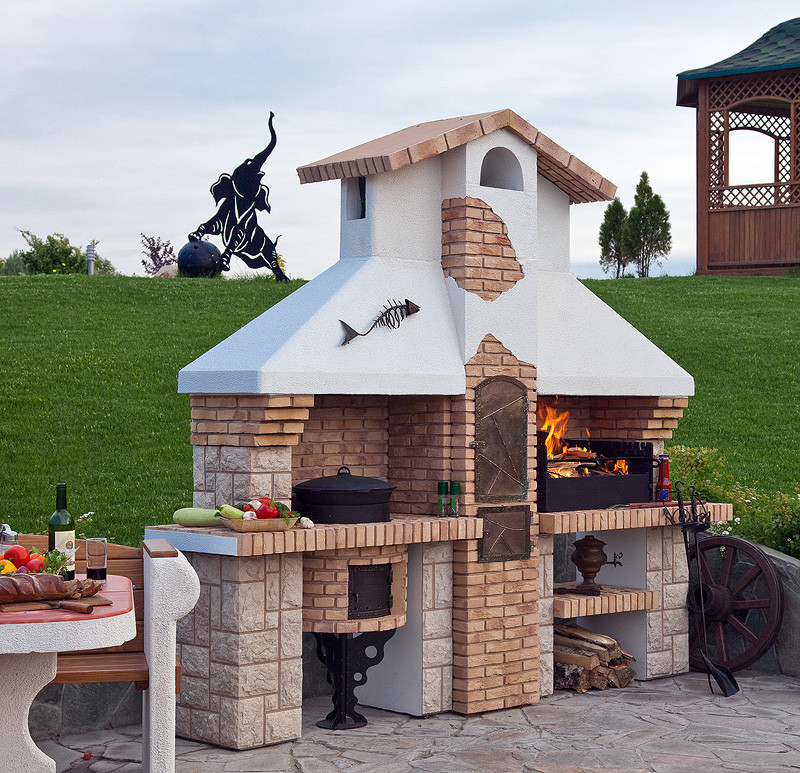
A barbecue complex combines multiple functions in one structure. Choosing the optimal option is not always easy, but the result is worth it.
In practice, when working with private clients, the most requested solutions are versatile ones—a grill oven for a gazebo with smoking capabilities. Such a structure allows for grilling, boiling, smoking, and even baking bread in one place, saving space in the gazebo.
| Oven Type | Temperature, °C | Main Purpose | Material Cost, $ |
|---|---|---|---|
| Mini Russian | 250-350 | Baking, slow-cooking | 400-600 |
| Pompeii | 400-500 | Pizza, quick cooking | 300-500 |
| Tandoor | 300-400 | Eastern dishes, flatbreads | 200-400 |
| Barbecue Complex | 200-600 | Versatile solution | 600-1000 |
This table will help you choose a design that suits your culinary preferences and budget.
Necessary Tools and Materials for Building a Summer Oven
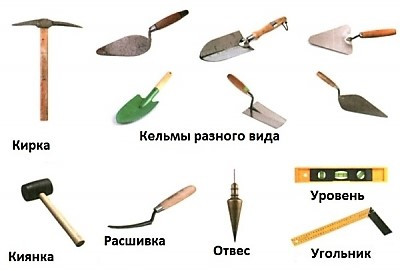 A garden oven requires high-quality materials and the right tools. Saving here is not advisable.
The main list of materials includes 200-300 firebricks for the firebox, 400-600 red bricks for the body, 15-20 bags of refractory clay, metal doors, and grates. In practice, quality materials last three times longer than cheap alternatives.
Critical dimensions: foundation thickness of 15-20 cm, firebox walls made of firebrick at least 120 mm thick, and a 5-10 mm expansion gap between the firebrick lining and outer walls for thermal expansion.
| Material | Quantity | Cost, $ |
|---|---|---|
| Firebrick | 200-300 units | 200-350 |
| Red Brick M150 | 400-600 units | 120-180 |
| Refractory Clay | 15-20 bags | 100-150 |
| Doors and Fittings | Set | 80-150 |
| Cement M400 | 10 bags | 50-80 |
| Rebar d12-16mm | 50-80 kg | 40-70 |
This estimate will help you plan your budget and avoid unexpected expenses during construction.
Tools for oven masonry include a builder’s level, trowel, pick hammer, jointing tool, and buckets for mortar and water. A good tool is half the success.
Choosing Materials for Oven Construction
Firebrick is the foundation of a durable structure. Firebrick withstands temperatures up to 1650°C, ensuring safe operation.
Use only firebrick for the firebox—saving here is inappropriate. Regular red brick is suitable for outer walls and decorative masonry.
Professional secret: Add 100g of table salt per bucket of clay mortar to increase masonry strength by 15-20%.
A special refractory mortar is required for oven masonry. A 1:3 clay-sand mixture creates a plastic base.
Quality clay should soak for 24 hours before use. Checking mortar readiness is simple: roll a ball and drop it on the floor—it should not fall apart.
Foundation for a Gazebo Oven
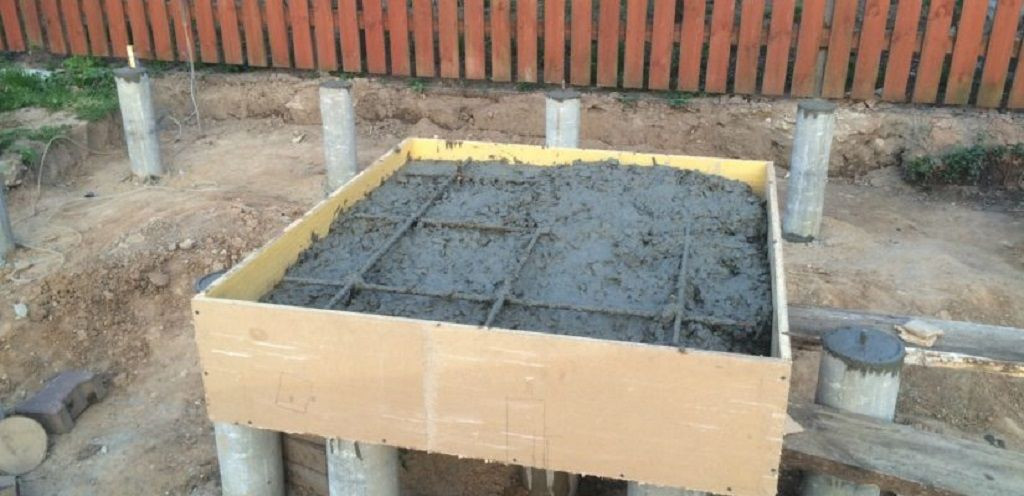 The oven foundation requires careful load calculations. A brick oven weighs 1-3 tons, creating significant pressure on the base. In one recent project, underestimating this factor led to the structure settling within six months of use.
An additional foundation is laid to the frost line depth—usually 80-120 cm. Reinforcement with a metal mesh is essential to prevent cracks from thermal expansion.
Double-layer roofing felt waterproofing protects the masonry from capillary moisture, preventing seam damage in winter.
Step-by-Step Garden Oven Masonry Technology
 Oven masonry starts with the base row. A builder’s level is your best assistant at this stage.
Check each row for horizontality and verticality of corners. The firebox is formed from firebrick with walls at least 120 mm thick.
The gazebo chimney requires proper cross-section calculation—usually 1/10 of the firebox area. This is a golden rule of oven construction.
Important observation: In practice, beginners often underestimate the importance of a level first row. Even millimeter deviations accumulate and cause issues in upper rows.
Clean the masonry with a damp cloth every 3-4 rows to prevent mortar buildup and improve the oven’s appearance.
Chimney and Ventilation for Gazebo Barbecue
 A proper chimney ensures safe oven operation. The pipe height depends on the distance to the ridge: less than 1.5m—50 cm above the ridge; 1.5-3m—at ridge level; over 3m—not below a 10° line from the ridge.
The inner diameter is calculated based on oven power. Studies by Masonry Heater Association show that proper airflow calculation is critical for efficient brick oven operation.
Chimney draft acts as the system’s invisible engine. Insufficient draft causes smoke, while excessive draft leads to fuel overuse and rapid wood burning.
Considering the gazebo’s design, provide additional ventilation holes for fresh air intake—at least 200 cm² per kW of oven power.
Success story: In 2020, the Johnson family from Portland built a Pompeii oven for $800. The first firing caused smoke due to insufficient chimney height. Adding a 1.5-meter section fixed the issue. Now it’s the centerpiece of family gatherings for pizza and roasted vegetables. “The taste is incomparable to an oven—it’s like a trip to Italy every time,” says John.
Safety Requirements and Fire Prevention Measures
A garden oven demands strict fire safety compliance. The distance to combustible materials must be at least 1 meter, and to wooden gazebo structures—1.5 meters.
The floor around the oven should be covered with non-combustible materials within a 1.5-meter radius, and at least 0.5 meters in front of the firebox. Metal screens or brick masonry with a 2-3 cm air gap protect wooden gazebo walls.
Installing a spark arrester on the chimney reduces the risk of roof fires. Ensure a fire extinguisher and a sand box are available near the oven.
Critical note: Check local building codes before starting work. Some areas require permits for ovens with power exceeding 5 kW.
Cost and Economic Efficiency of the Project
Building a summer kitchen with an oven requires smart budgeting. The material cost for a barbecue oven ranges from $500 to $1500, depending on size and complexity.
A ready-made barbecue oven with similar specifications costs $1500-4000, making DIY construction a cost-effective solution. Detailed project planning, as recommended by This Old House, helps avoid mistakes and extra costs.
Operational costs are minimal—3-5 kg of firewood per cooking session costs $2-3, comparable to a gas burner but offering the unique smoky flavor and authentic cooking process.
In one project last season, clients calculated savings from using the oven 2-3 times a week. The project paid off in 12-18 months, depending on usage intensity.
First Firing and Oven Drying
 A new outdoor oven requires proper drying before use. This critical step prevents masonry cracks.
The drying process takes 7-10 days. For the first three days, heat the oven gently for 2-3 hours daily using thin wood chips and paper. The temperature should not exceed 80°C—water turns to steam at 100°C, which can damage seams.
In practice, haste at this stage leads to cracks. Moisture must escape gradually, like steam from a kettle.
From the fourth day, increase firing intensity, reaching 200-300°C. Full use begins after a week of proper drying.
Important rule: Avoid maximum temperatures during the first month of operation. The oven needs to gradually adapt to thermal loads.
Oven Operation and Maintenance
An outdoor oven requires regular maintenance for long-term performance.
Clean soot at least once a season and inspect the chimney every six months. The grill area needs special care after each use.
Professional tip: Store firewood in a dry place with no more than 20% moisture. Wet wood reduces burning temperature and doubles soot formation.
Advanced Features and Oven Modifications
 A modern summer kitchen oven can include a smoker for preparing delicacies. A built-in smoking chamber expands culinary options without significantly increasing costs, adding just $50-100 to the total.
A gazebo fireplace creates an additional comfort zone for cool evenings. A combined oven-fireplace design is especially popular in northern regions to extend the gazebo’s usability.
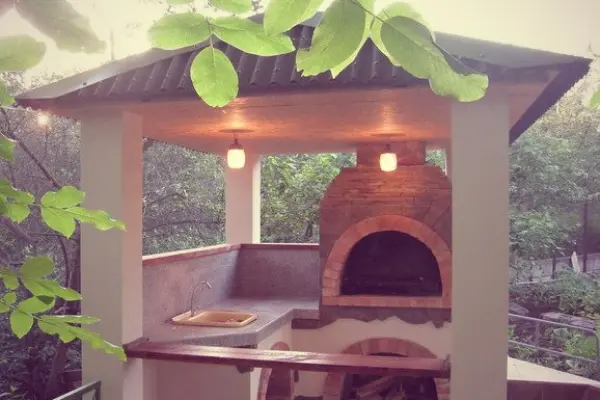
A multifunctional barbecue complex can include a cooktop, oven, smoker, and even a sink, turning the gazebo into a full-fledged summer kitchen for family relaxation.
Each additional feature complicates the design and increases costs. Plan modifications at the design stage, not during construction, to save up to 30% of the budget.
Popular additions include built-in firewood shelves, natural stone work surfaces, and work area lighting. A tandoor oven can be combined with a classic grill in one structure, creating a versatile cooking station.
Automatic air supply and temperature control systems make oven operation maximally comfortable, like switching from a manual to an automatic transmission—same functionality, greater convenience.
A modular oven allows starting with a basic configuration and adding elements over time. This approach reduces initial costs and spreads investments out.
Conclusion
Building a gazebo oven yourself is an exciting project combining technical skill and creativity. A well-designed and constructed home oven lasts decades, becoming the centerpiece of family gatherings and culinary experiments.
The key to success lies in careful planning of each stage, from selecting quality materials to following masonry technology—every detail matters.
Safety comes first. A properly calculated chimney, solid foundation, and adherence to fire safety regulations are not optional but mandatory.
In practice, the most successful projects are those where owners take their time, study others’ experiences, and consult professionals at complex stages. This approach ensures a result you’ll be proud of for years.
A summer kitchen with an oven transforms an ordinary gazebo into a multifunctional space for relaxation, cooking, and socializing. The invested effort and money will pay off with the aroma of freshly baked bread, the taste of authentic wood-fired pizza, and the warmth of a live fire on cool evenings.